I love cheese & crackers, and I’m in search of the ultimate servers for them. I keep finding new ideas that are just too good not to make.
But, one does not live by cheese alone. Sometimes, you need some dip, too.
These dip servers are 13″ square and have a 6 ounce ramekin in the corner for your favorite dip. Plus, these are 2-sided servers, so you can flip the Dip Server to the back and have a square surface for … cheese & crackers, charcuterie, or your favorite appetizer.
Knowing that the best way for me to show new ideas is with pictures of the boards in action, I was able to entice Mrs M to create some delectables so we could get great action shots.
Bonus: I get to eat the props. Here you see sourdough pretzel bites with beer cheese dip.
Double bonus: live healthy. Eat fruit & dip it in fresh whipped cream.
I’m very happy with these new serving pieces; they offer a new & different presentation. My friend, Jeff Hewitt of Culinary Woods, suggested this design was one I should make. He was oh, so right. Check out his work, here.
I have relaunched MrMsWoodshop.com so you can buy my work directly, and to celebrate this new endeavor, there are 2 promotional offers available right now. But, don’t delay – the offers expire on May 31:
Free shipping on all purchases over $50
Save 20% on all purchases site-wide with the promo code “MrMsLaunch”.
I sold so many of these so quickly when I introduced them, that I knew I was in big trouble if I didn’t make them in quantity. Back in the day, I was planning on doing 10 big events in the 4th quarter this year, and I knew I would need at least 100 Cracker Things to make it through those events.
The year was 2019. Life was good.
But the calendar turned, 2019 became 2020 and none of us will forget this year anytime soon.
Will I need 100 Cracker Things?
Forget big, will I have any events this year?
Such are the questions that trouble me. No, that’s not true. I’m not troubled. Confused, I am. I mean, aren’t you?
But some things are very clear to me … such as the look of a perfectly appointed Cracker Thing:
I’m going to stick with what I know, and let the world figure out the rest. As I have sometimes heard over the last 739 days of this never-ending quarantine, my opinion doesn’t matter. But, I do know that while that may be the case, I can find solace in the garage woodshop. And, my solace just might be your Cracker Thing!
55 Cracker Things have made it to the finish line this week, and all are now available on my new website, MrMsWoodshop.com. If you read this blog, then you might know that – just until May 31 – I’m offering free shipping for orders over $50, and 20% off everything, site-wide, when you use the promo code “MrMsLaunch”.
Alas, I cannot bring back the California Grizzly Bear, which was last sighted in 1924 and declared extinct shortly thereafter. It was hunted to extinction after the gold rush caused ’49ers to encroach on the bears’ habitat.
I do have a couple of stories about the bear that first graced the flag of the very short-lived independent California Republic. That happened in 1846 … and apparently California has been dependent ever since.
Bear baiting, where bears were put into fights against bulls, were a big spectacle in the California of the 1800s. Horace Greeley, a newspaperman of great accomplishment, saw one of these fights and observed that a bear fought with a downward swipe while a bull countered with a horn’s upward thrust. This caused Greeley, it was said, to coin the terms of bear & bull markets for Wall Street.
This wasn’t fake news (joke! It’s a joke!), but it wasn’t true. The popular term (OK, not so popular with most) for a bear market has a very different beginning, which you can read about in Merriam Webster’s article, here.
California has plenty of wild spaces where grizzlies could thrive, but efforts over the last few decades to move up to 500 grizzlies back into California have not been successful. You can draw your own conclusions about whether California is wild enough to support the mighty grizzly bear.
The bears that I make are all from Black Walnut, and measure 19″ from nose to tail. They stand about 9-1/2″ high.
These bears and everything else that I make in the Woodshop are now available on my new site, MrMsWoodshop.com. Special offers for this one-time-only launch month are free shipping for any order over $50, and 20% off everything, site-wide, when you use the promo code “MrMsLaunch.”
Here’s the link to go straight to the page for these California Bears.
If ever there was a time when we needed a little more heart, this is it.
I’m happy to do my part.
These hearts have unique wood designs. Note that all of these woods appear in their natural colors; I only apply mineral oil and Mrs M’s Board Butter as the finish. Here are the hardwoods used in these hearts:
Bloodwood, AKA Satine. Of course. These are hearts; they have Bloodwood in them. From tropical South America.
Jatoba, AKA Brazilian Cherry. Found in the West Indies, and from southern Mexico to northern South America.
Hard Maple, AKA Sugar Maple. It’s also true that this wood is known as Rock Maple, but when used in hearts, I only think of it as Sugar Maple. From the USA.
Cherry, AKA American Cherry or Black Cherry. From the USA.
Canarywood, AKA Canary. While a heart should not be thought of as a bird, hearts do sing. From Panama south to Brazil.
Purpleheart, AKA Amaranth. From Central & South America.
Bubinga … a wood with a name so fun to say, it really doesn’t need an AKA. However, it has one … and it’s fun to say, too: AKA Kevazingo. This is a fabulous musical wood, and it belongs in hearts. From equatorial Africa.
One more thought on how I make these hearts: although every heart is unique, I do make them 2 at a time. Though different, you can certainly conclude that hearts have a complementary match, if only you can take the time to find it. The last 2 pictures in this gallery are matched hearts, just for fun.
Finally, I have launched MrMsWoodshop.com this weekend. You can now buy these hearts with a click! Through the month of May, there is free shipping on all orders over $50. Plus. PLUS! You can save 20% off of every board on my site with this discount code: MrMsLaunch.
Don’t delay long, though, as the code is only good through May 31. And I promise I will never offer this 20% site-wide discount again! Here’s the direct link to the Hearts page.
2020 has been an adventure so far, have you noticed?
Making these coasters, I embraced the chaos. Not one set of them is symmetrical. That’s very unusual for me.
Like 2020.
So, you can get chaotic sets of 4 similar coasters … or you can go for it, and get 4 coasters, all with different designs, that just belong together. You get to choose!
I launched the new & improved MrMsWoodshop.com yesterday, and have been very encouraged by the compliments and, frankly, the sales generated. You can now buy directly from the website, and these coasters are available there.
2 special offers are happening through the end of May: free shipping for any order over $50, and a first-ever promo code that gives you 20% off of your purchase. Just enter “MrMsLaunch” as you check out. Both of these offers expire on 5/31 … and I promise I won’t offer the 20% off site-wide discount again.
If you would like to go directly to the page with these coasters, here’s your link. Enjoy!
But, don’t dawdle! The discount is only offered through May 31, and I won’t repeat this offer. Ever. Promise!
On this site, you’ll see several posts over the next several days with a LOT of new pieces that have just made it to the finish line. I’m headed to the shop today to photograph the 270 new pieces (!) that have just been finished.
And, there’s more to come … I have 100+ Magic Bottle Openers that are just waiting for me to add that bit of magic for them to be done, too. Oh, and I’m not going to stop there. Much, much more to come from the Woodshop!
Thank you for your continuing support & interest in what I do. I appreciate it!
I have used a DeWalt 735 planer for years … and used it enough that I’m now on my 2nd one. So far, so good.
However, the unit is not perfect. Last year, I replaced the cutter head with the Shelix spiral cutter, and that was a HUGE upgrade. At the same time, I added the Wixey digital gauge, and that was a welcome upgrade as well.
Today I’m dealing a simpler problem: the onboard Cursed Circuit Breaker that’s well known to wear, and then thermal out easily. And, once the breaker starts breaking, it breaks more easily every time.
My Cursed Circuit Breaker was worn out. It was popping every few minutes with practically no load at all on the planer. So, it’s time to change the breaker for a new one. The problem, though, was that even with a machine as common and sought after as the DW735, I could find no precise guidance online on how to swap the tired circuit breaker out for a new one.
Here, then, is a photo guide with notes for you to take into the shop when you want to make a similar switch. Start to finish, this took under 30 minutes … and I was searching for tools and taking pictures for you at the same time!
First, UNPLUG THE UNIT.
14 screws have to be removed to access the circuit breaker behind the front panel. To start, take off the top, just as if you are switching out the blades. That will give you access to 3 Phillips head screws across the top of the unit.
Then, take off the hex bolts on the bottom corners of the front face. The allen wrench I used must have been metric; it was larger than 7/64″. 3mm, perhaps?
Then, take off the toggle for the blade speed. Finally, take out the 3 screws holding the depth gauge face plate in place … so you can access the single Phillips head screw behind it that’s holding the front face in place.
Now you can gently lift and rotate down the front face plate, exposing the wiring for the switch and circuit breaker.
Slide the 2 spade plugs off of the circuit breaker, and you’re ready to unscrew the keeper ring from the front of the unit to free the Cursed Circuit Breaker. I needed a small pair of pliers to grip the nut.
With the nut off, the cursed circuit breaker can now be removed from the unit and compared side by side with its replacement.
The cursed Circuit Breaker in my unit was a Sang Mao A-0701 18a breaker. It was made in Taiwan and is actually fairly commonly available for about $10. I got a comparable model off of Amazon; this type of breaker is used in portable generators, apparently. But I digress.
Put the new circuit breaker in place, replace the spade plugs onto the contacts. Check the main switch as well … I had accidentally removed one of the spade plugs on the main switch. Easy enough to plug it back into place, replace each of the 14 screws … and I was once again back to making sawdust.
Before the world went to hell, I got an order for a bunch of signs. There’s a small string of west coast galleries that likes my work, and they’ve placed a few orders in the last few months, which is great.
Then, as I was saying, the world went to hell. The galleries are now closed, of course, and these signs are waiting … for the world to want to go out and find a cute little boutique that has some great stuff.
That won’t be tomorrow, I’m sure. But next month? I hope so.
The majority of these signs will ship to those boutiques when they’re ready for them. Since I was making a batch of signs anyway … I added a few and made a BIG batch. 78 signs. That’s the biggest batch of signs I’ve made.
How long will they last? No clue. After all, I got notice from another event today that it will not happen. Maybe events will start up over July 4th? That’s my new target for people to want to go out, bump elbows, and see some fine arts & crafts in an outdoor setting.
I’m now going a-vendoring solo more often than I’m out with Mrs M. I normally double my booth to a 10×20 now. And with more space in the booth … that means I need to up my creativity to maximize each opportunity.
After all, I can’t just show up.
I have no clue what this year will turn out to be – for any of us. But I do know, when craft fairs, art shows, street festivals & such are once again happening, I better bring my best ideas to market, because I expect customers will be very choosy. Resources will be precious. I need to respect that.
When I set up my “standard” double booth these days, I put a 6′ table front & center, and then a taller 4′ table behind it. That results in good things for the look of the display.
That configuration, though, creates a 2’x2′ space behind the 6′ table that is wasteful. After all, I pay a lot of money to rent that space. How to fill it?
This is a common problem for vendors: how to fill the booth with a pleasing display. I’ve gone through several iterations for Mrs & me. Want to see our incredibly humble beginnings? Here’s booth # 1, from March 2014:
Mrs. M and Mrs. M, before they opened on their first day. Smiles on faces, and that is a very good thing!
Only one direction to go from there!
But, on to the task at hand … how to fill that 2′ x 2′ space in 2020.
After a lot of thinking, I had the idea. For me, that usually results in a high-faluting, incredibly complex plan on paper, and here was this one.
That’s 4 pages of planning! No wonder it took me months to get this built.
Note that I custom build all of my display pieces. I believe that reinforces what I do as a craftsman: customers appreciate that I make everything they see. It’s how I get the best possible display for the boards & games & such that I make. Your mileage may vary.
The final result is that I took those 4 square feet of booth space, and will now effectively display 36 handled boards! That’s far, far better than my old display for handled boards, when I just put them in a crate on a table, or hung them from the rafters so people bumped their heads on them.
Yes, it happened. More than once. And, I’m sorry.
Clearly, I needed an upgrade.
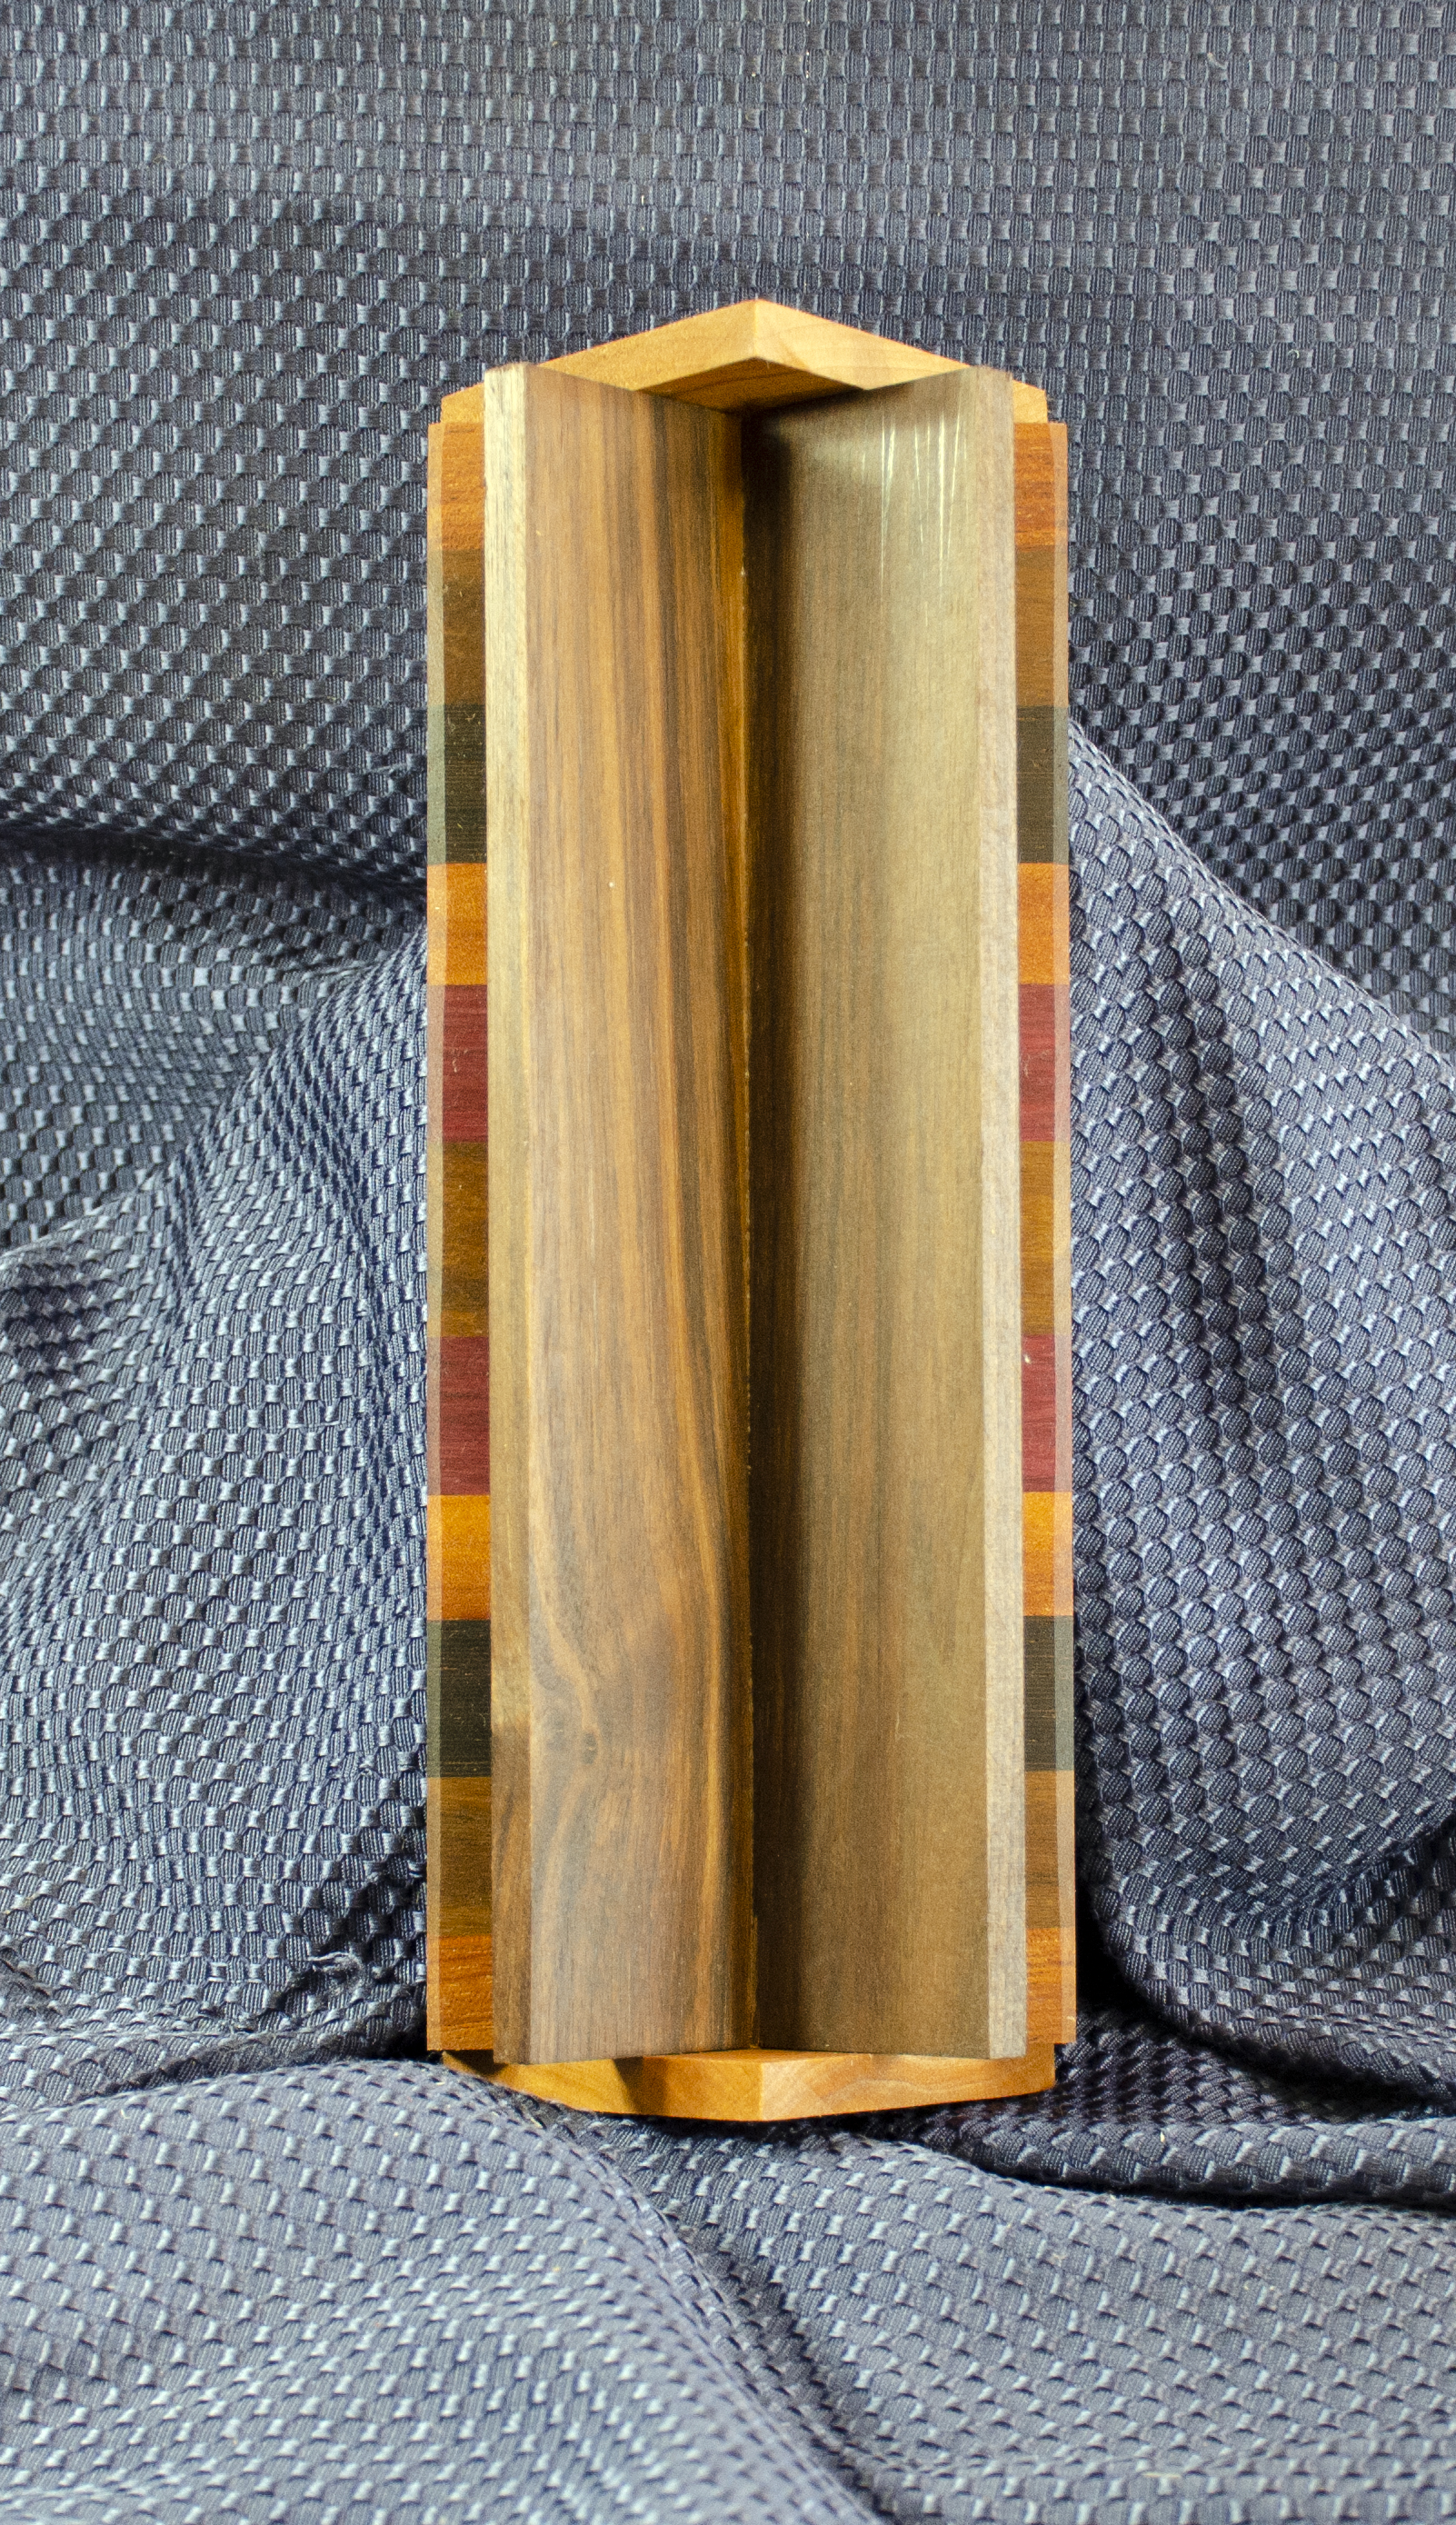
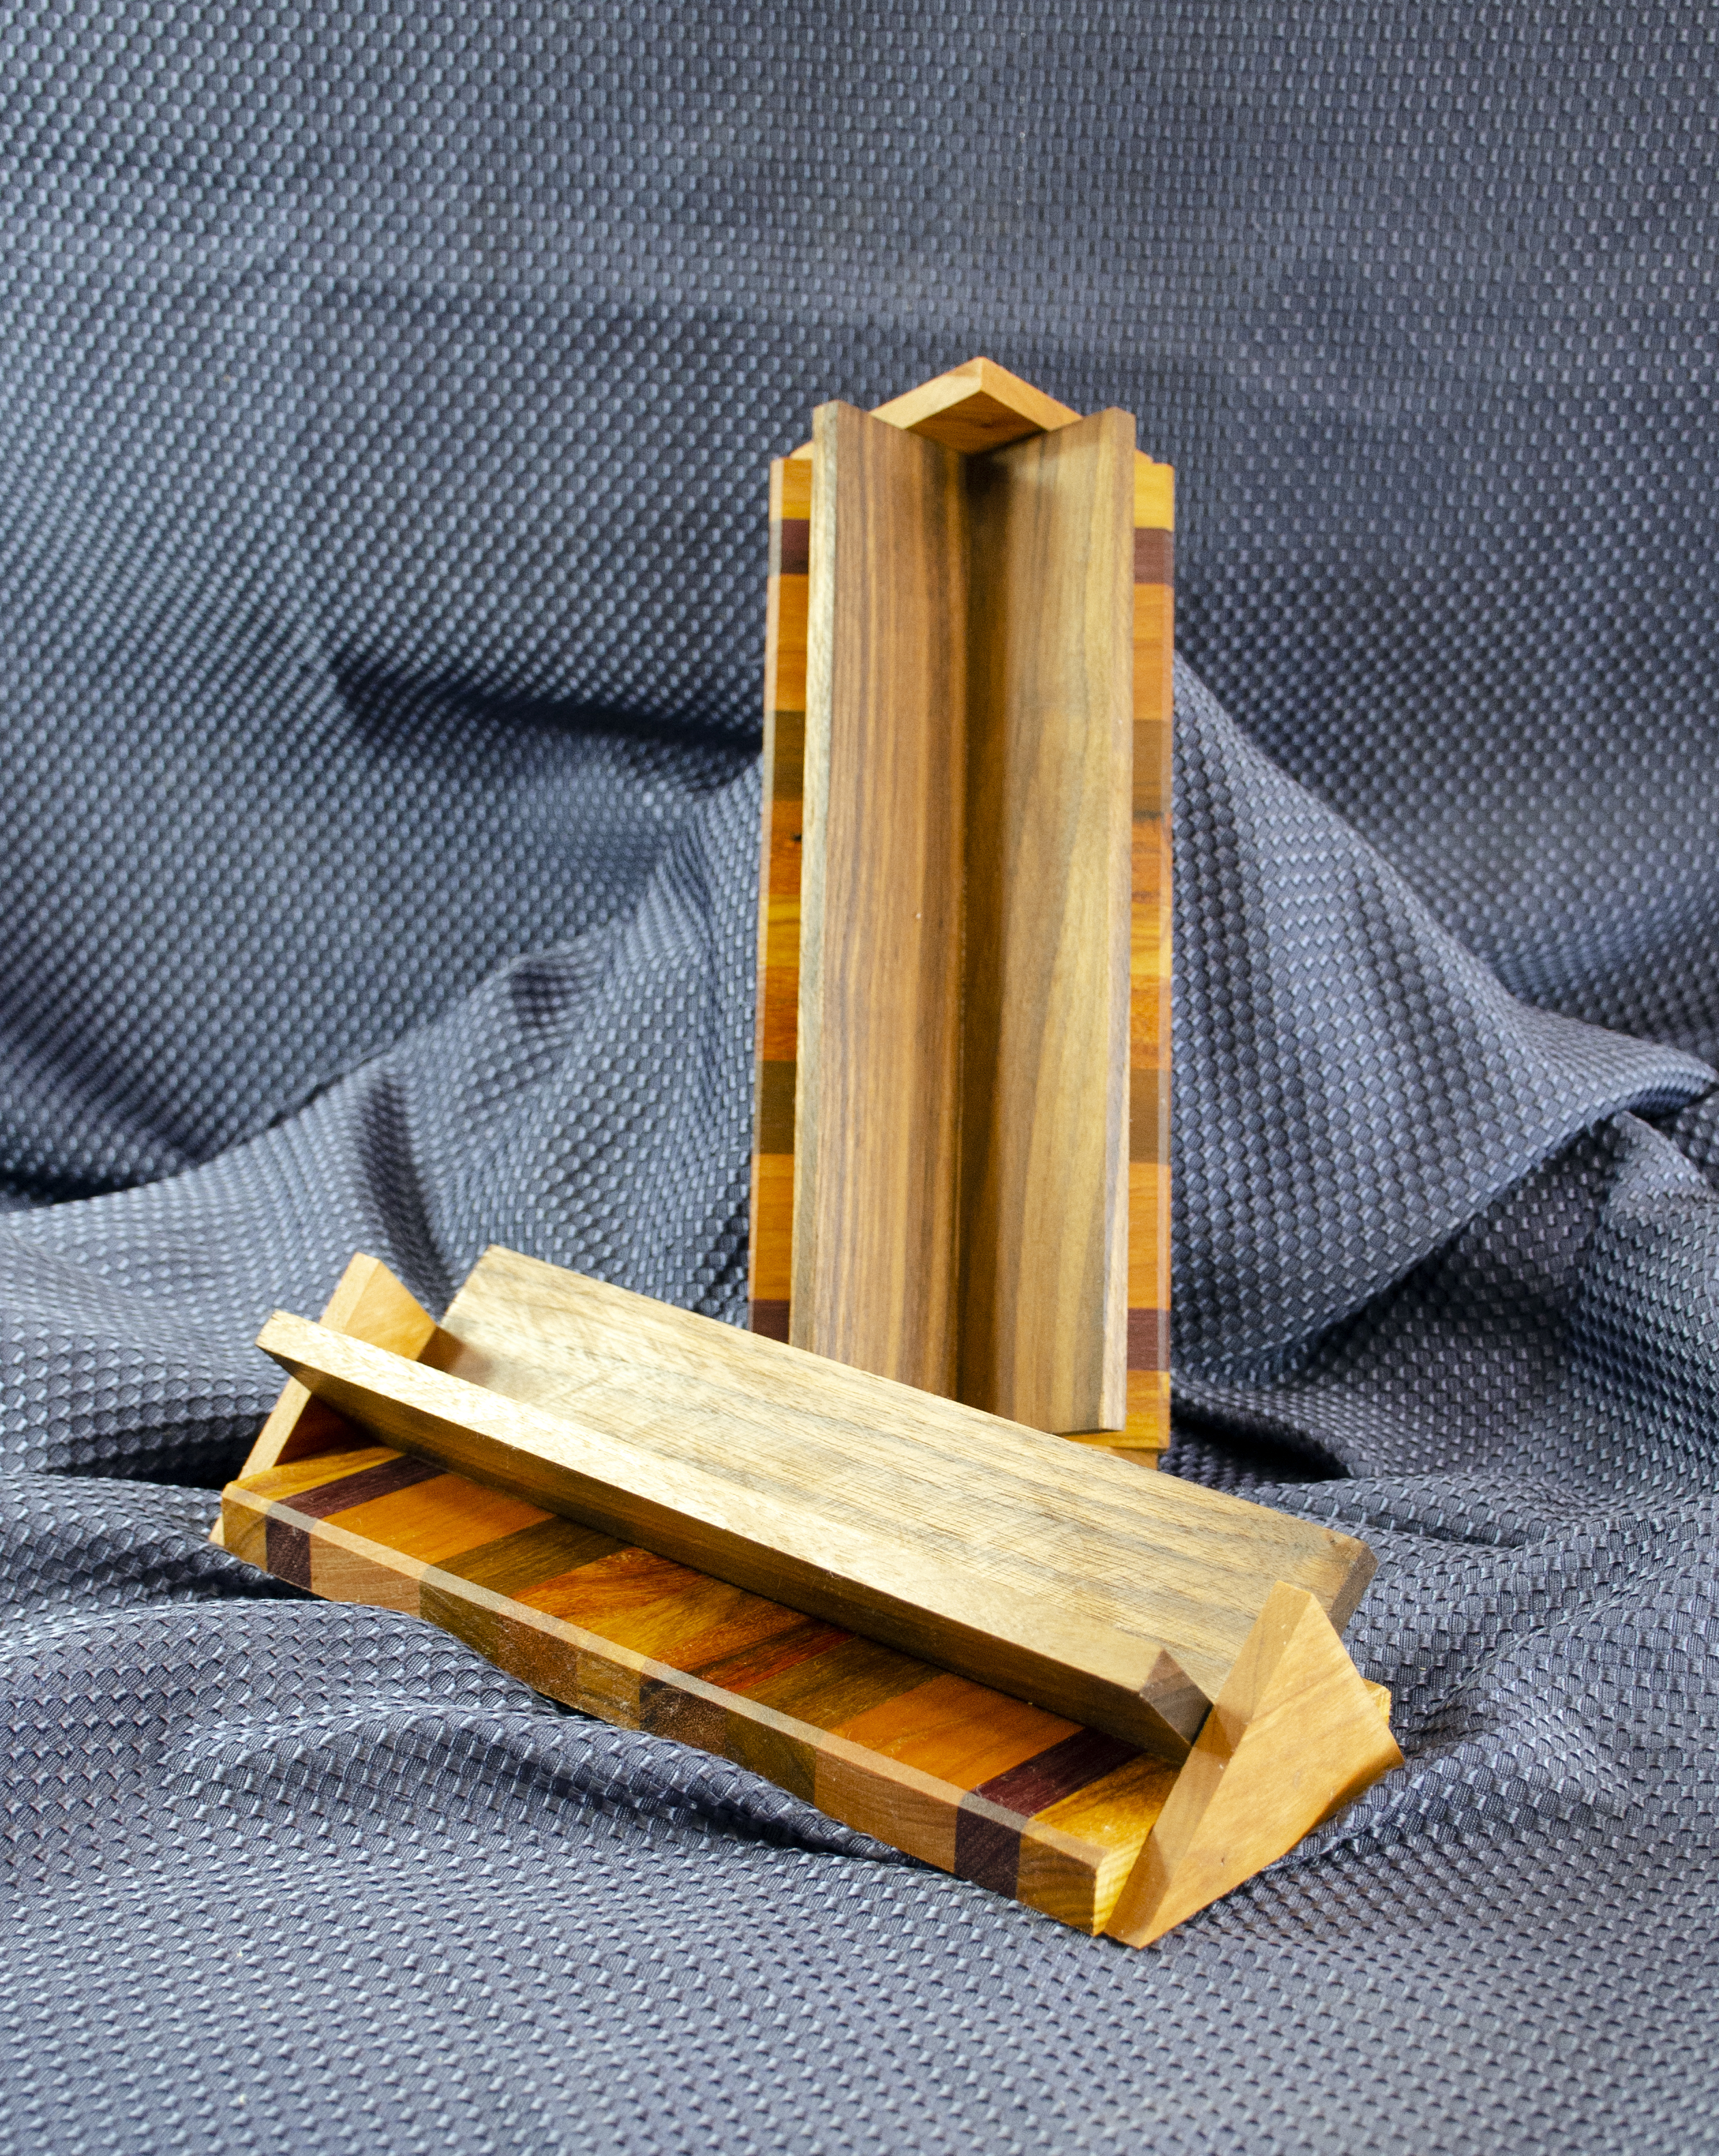
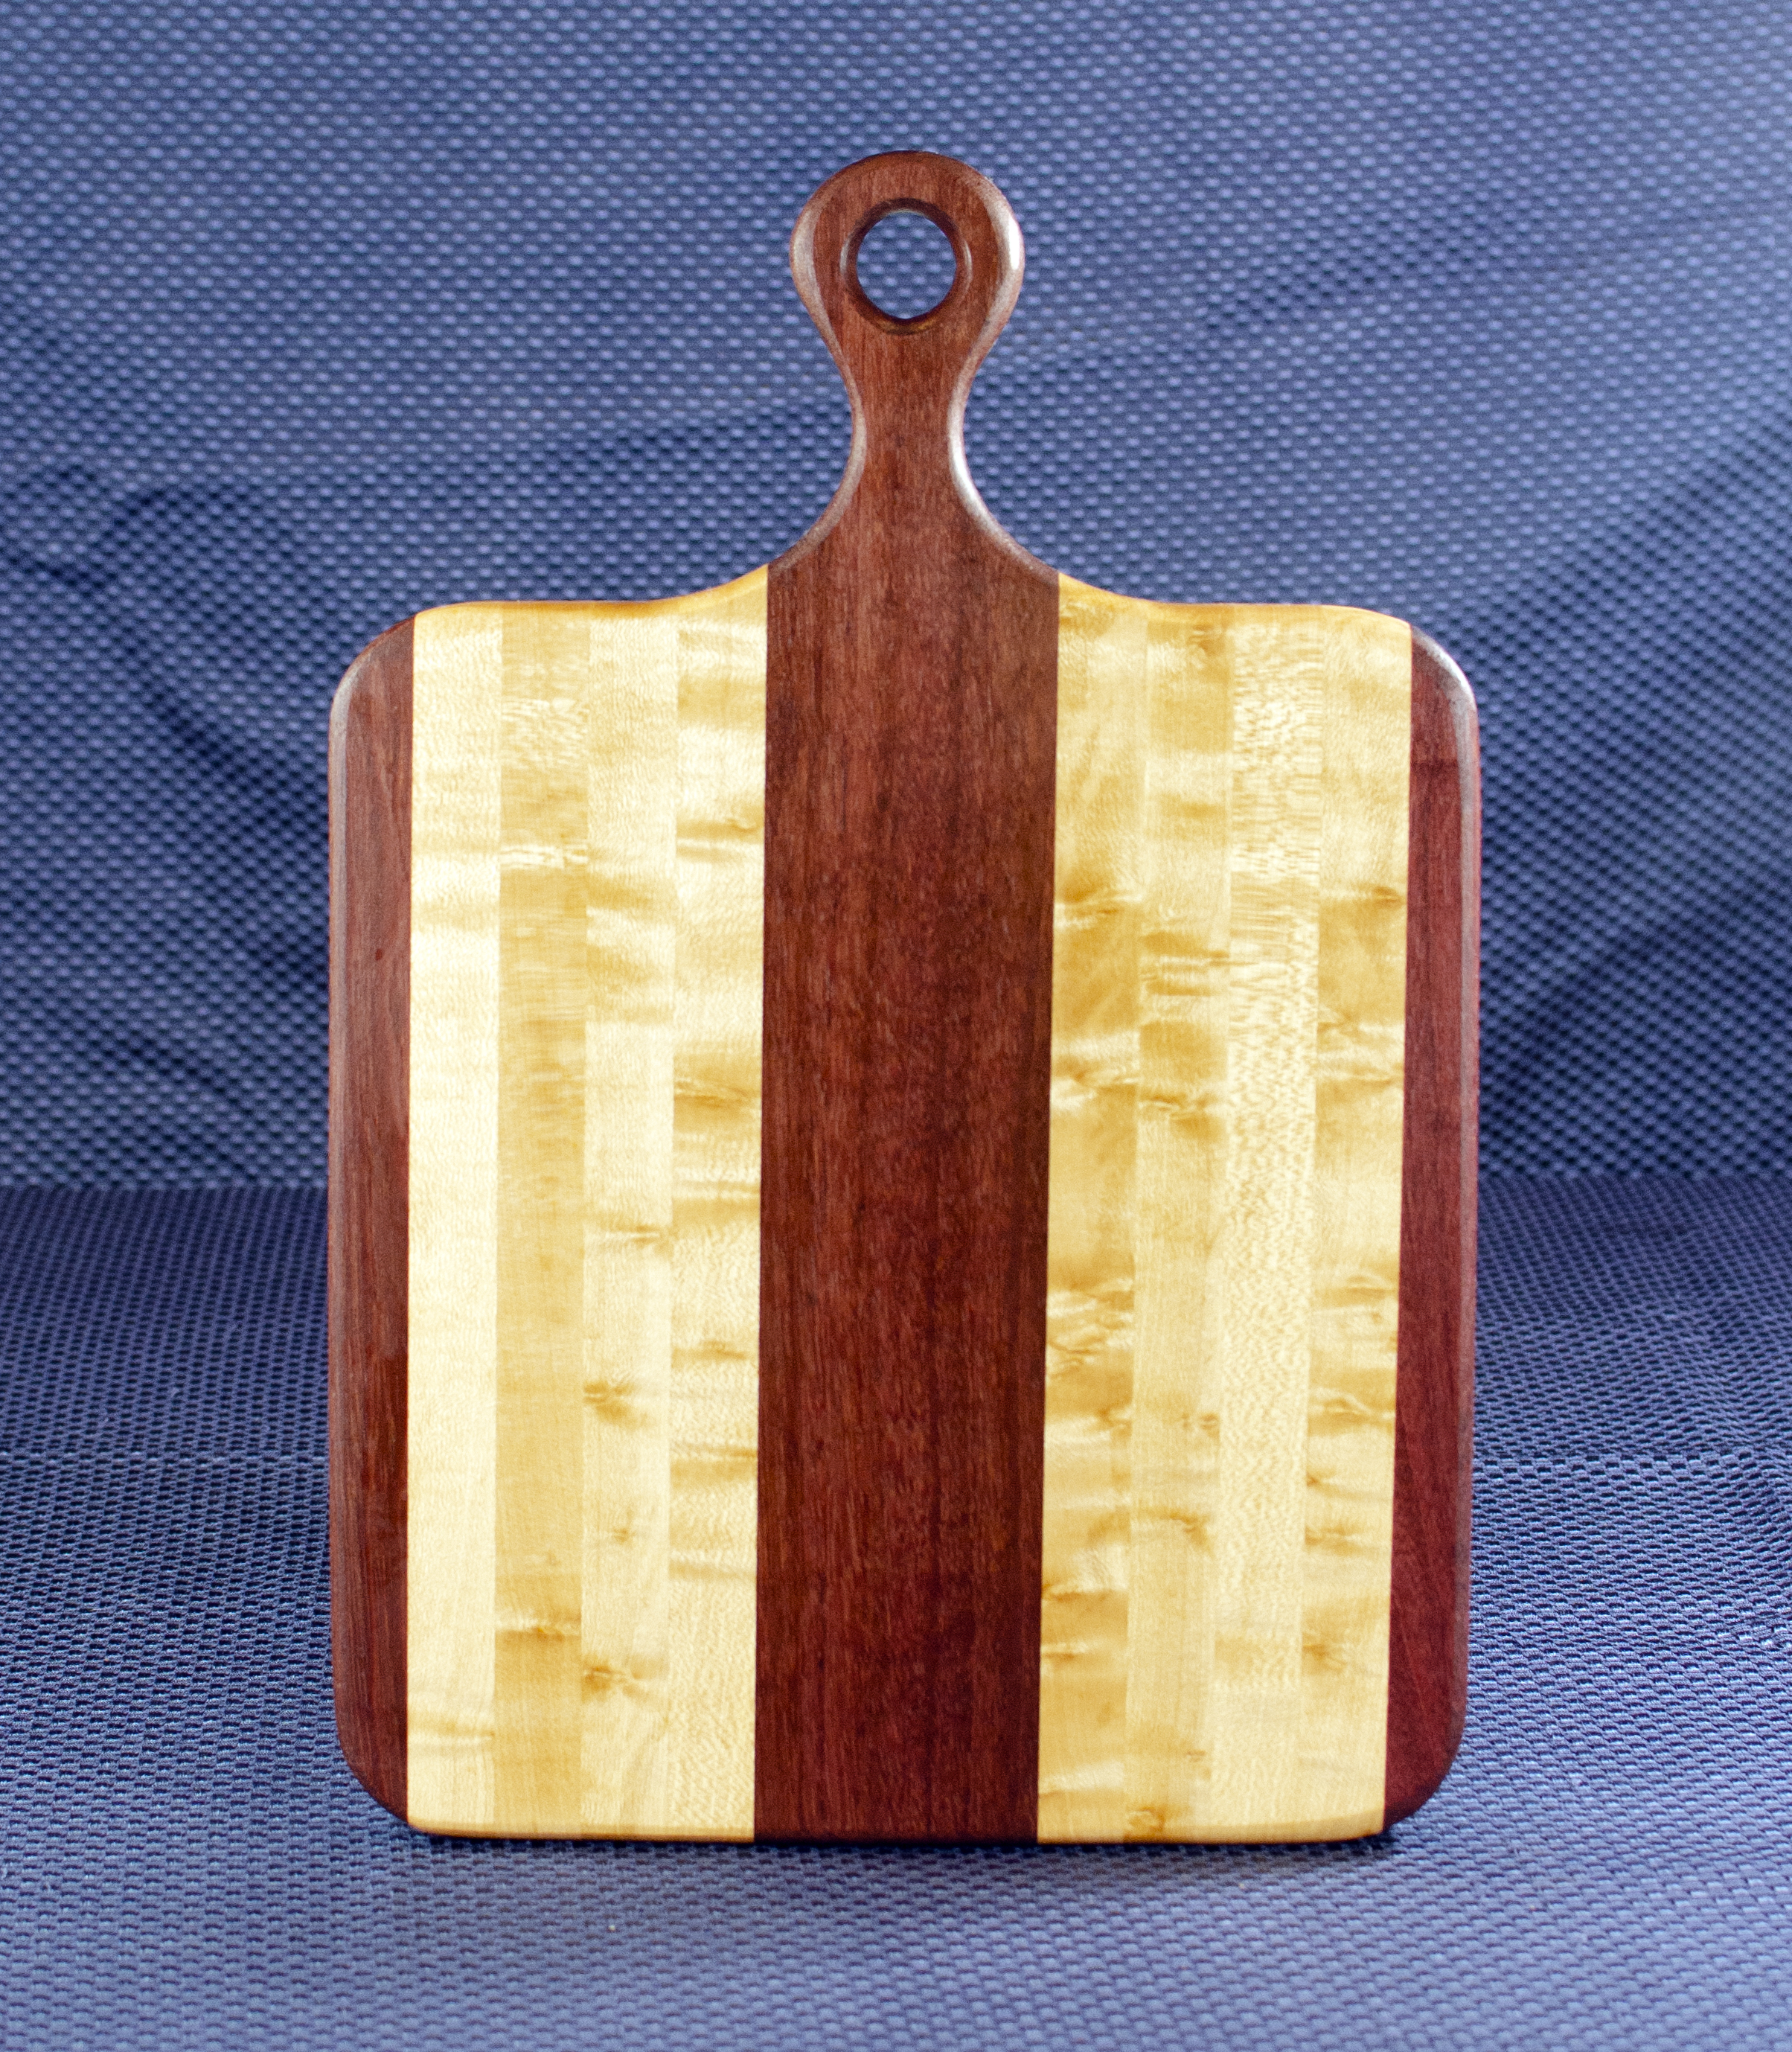
I actually have 5x different shapes that will hang from the display. For pictures of my current inventory, go to the links at the bottom of this page. For brevity, here’s a picture & description of each of the 5 boards that I have now produced for this display. Note that one shape comes either with or without juice groove … though in this shape, I view these groovy boards as having crumb catchers, not actually juice grooves. But that’s me.
OK, OK. I know. One of the designs just has a hole, not a handle … but work with me here.
So, now, to the design of the display. I had a few criteria:
The display has to come apart for transport.
Signage must be integrated.
Flexibility is a must!
The display piece stands well over 6′ tall. The base is 22″ square and is on wheels. The tower rotates on a Lazy Susan bearing, and is built (probably over-built) to reliably hold more than 100 pounds of boards. Hangers are removable, of course, and secured to the tower with french cleats. 4 bolts attach the tower to the base, and 3 attach the sign on top.
3 boards are displayed on each of the 12 pegs. 4 boards will fit, but I’m keeping the display to 3 each for both brevity and to make sure nothing will fall while customers are fondling the boards.
These pictures were taken on a windy spring day (on the patio!), and the 36x boards cards were fluttering in the breeze. I’m going to tuck those cards behind the boards when I set up the display, just to improve the look. My customers appreciate the cards, the identification of the woods and the care instructions attached to the boards … but with a breeze, they proved to be a distraction.
Lessons Learned
The tower, even with the holes cut into each side, is heavier than I had hoped. It’s primarily made from 3/4″ plywood … I should have used 1/2″, I think. Cutting the weight by 1/3 would have been good. I am debating whether to build a shelf in the trailer to transport this piece and other tall display pieces.
The Lazy Susan bearing works, but the assembly is too heavy for people to turn it comfortably, I think. That’s OK. I’ll either assist the customers, or simply let them pull the “hidden” boards from the other side of the display to see them.
Love the sign. Mrs M takes credit for the slogan. After 41 years of marriage … I let her take all of the credit she wants.
I got a significant order last month. It was another collaboration with my engraver … and her client, as well. The cable network Starz wanted to do something nice – very nice – for the makers of their series Vida, which premiered its third and final season this week.
Clear Image Printing produced a lovely book about the show. Lavene & Co, my laser engraving partner, produced custom shot glasses, sand blasted & personalized bottles of Patron, and then laser engraved the lid of the custom wooden box that I made to hold it all.
The boxes I made were custom designed to tightly hold 4 shot glasses, the bottle of Patron and the commemorative book. I worked through 5 different prototypes, tweaking the design with the client to ensure it would be precisely what they wanted.
This was not a small order for my one man shop. I started with 600 board feet of 1/2″ Hard Maple. Now, typically, I have no way to store that much lumber at once. Fortunately (?), however, I was on an event break due to the Corona virus while working on this project, so I used the cargo trailer for temporary lumber storage as I was working on machining the 19x parts each box required!
The first thing to do is to break the lumber down from 12′ lengths into 6′ lengths that are easier for me to manipulate in the shop … and store in the 10′ trailer, for that matter.
I start with lumber.
Once the lumber was in the trailer – and protected from the rain that was on the horizon – then I was ready to start machining the parts.
102 boxes times 19 parts each equals 1,938 parts.
It’s all about the parts.
102 boxes times 4 shot glasses each equals 408 holes to be drilled.
Thank goodness for the CNC, which did these shot glass holders in groups of 4.
The box lids needed to be assembled first, so they could be engraved. That meant building them, then staining them, wiping them dry and getting them to the engraver.
Mrs M made a rare appearance in the driveway shop annex to help with the staining. That gives you some indication of how far behind I was when the deadline was breathing down my neck.
Then, I could start on the boxes themselves.
It was during a late session that things got, uh, exciting. That’s not good in the shop. Ever.
I was cutting the Patron bottle holders. They fit under the bottle neck to cradle it and keep the bottle from moving. I ran 10x at a time on the CNC, then had to cut them apart. That’s when I screwed up.
I made the cut, which was open faced (translation: no blade guard possible). The off fence side was not pushed through with my push stick; only the fence side was supported.
I’m not sure what happened … but I do know that one of the pieces was kicked back. That’s what got exciting.
Launch angle: about 30 degrees
Exit speed: 102 miles per hour
Elevation: about 5 feet
Throw distance: about 12 feet
Impact: spectacular
Here’s the piece:
You can see where the blade grabbed the workpiece, and then the straight line where the sawblade propelled it upward, forward, and straight into the light fixture at the rear of the table saw. It bent the metal fixture, and then exploded both of the flourescent tubes.
BANG! Glass rained down on the shop. She said, while standing in the driveway shop annex, “WHAT HAPPENED?”
That’s the dent in the fixture, with one tube now replaced.
Like I said, it was exciting. All my fault. So, clean up that mess, correct my Grrr-ripper so that both sides of the workpiece are supported, and get back to work.
Come to find out, I had to build and stain the box carcass, then stain the individual inner pieces (the bottle neck holder, the 1/4″ divider, and the shot glass holder) before they were mounted in the box. This was the only way to get an even stain coating on all visible surfaces.
Once the boxes were assembled, my least favorite part was upon me: installing 214 hinges and 107 latches.
After one very, very long night and a couple of long days, I was finally done. The boxes got picked up … and the client was very pleased with how it all turned out.