Here are my current signs, in a slide show. And lower on the page … NEW SIGNS coming for this holiday season.
CNC Sign 20 – 141 – In Wine
CNC Sign 19 – 750 Let Food
CNC Sign 19 – 745 Coffee Def
CNC Sign 19 – 742 If More of us Valued
CNC Sign 19 – 739 Why Limit
CNC Sign 19 – 741 Many Have
CNC Sign 19 – 738 Too Much
CNC Sign 19 – 731 You Don’t
CNC Sign 19 – 725 People Who Love
CNC Sign 19 – 724 You Don’t Have To
CNC Sign 19 – 708 – Chicken
CNC Sign 19 – 706 If You Really
CNC Sign 19 – 705 – Only A Fool
CNC Sign 19 – 702 – Too Lazy
CNC Sign 18 – 115 Tell Me What Brand
CNC Sign 18 – 99 Cooking
CNC Sign 18 – 99 The Secret Ingredient is Always
CNC Sign 18 – 55. Hard Maple. 9″ x 14″.
CNC Sign 18 – 57. Hard Maple. 10″ x 16″.
CNC Sign 18 – 48. Cherry. 12″ x 16″.
CNC Sign 18 – 45. Hard Maple. 10″ x 14″.
CNC Sign 18 – 19. Hard Maple. 10″ x 18″.
CNC Sign 18 – 12. Hard Maple. 12″ x 16″.
These are software renderings of the new signs that are currently in production in the shop. The images are not entirely accurate, but they are the best I have at this point.
Not all of these signs are currently shown for sale on my retail site, but if you don’t find a sign that you want, just email me and I can do a special order for you. Here is the retail site for your review: www.MrMsWoodshop.com.
Little Girl was marrying E, and I asked if they wanted me to build anything for their wedding.
The answer was yes, and I got a to do list that was 3 items long:
A board for guests to sign. A keepsake.
Sets of candle holders to decorate the reception.
A heptagonal arch for the wedding ceremony.
I decided to make all 3 items out of white oak. I start with lumber.
No, this was not all of the lumber. I ended up getting a whole lot more lumber before it was all built.
The sign-in board was a simple 24″ circle, cut on the CNC. I then went to my buddy the flag maker, who used his laser engraver to cut words out of 1/8″ ply. Those were spray painted burnt umber with an acrylic spray, and then mounted on the piece. The whole assembly got a top coat of rattle can lacquer.
The time consuming project was making candle holders. I made 12 sets of 3 … so 36x pieces with 4 sides, 1 shelf and 16 accent pieces. Each. That’s a lot of pieces. The lumber had to be planed down to 1/2″ thick, so I generated a lot of sawdust on this project.
A lot of sawdust.
These candle holders are one of my favorite projects, actually; I first made them about 10 years ago for Christmas presents.
I have learned a bit and upgraded the garage shop since then, thankfully, so the lumber went from track saw to table saw to planer to table saw to CNC to router table to assembly.
A unique part of this project is how you assemble the sides that have chamfered edges to fit perfectly into a square without showing the wooden edges. No nails are used, just glue. And how do you join slippery sides of a square together without nails?
You rubber band them together until the glue dries.
Then you do the same process for the Walnut accent pieces, rubber banding them into place until that glue dries. The raw wood was then finished, again, with rattle can lacquer.
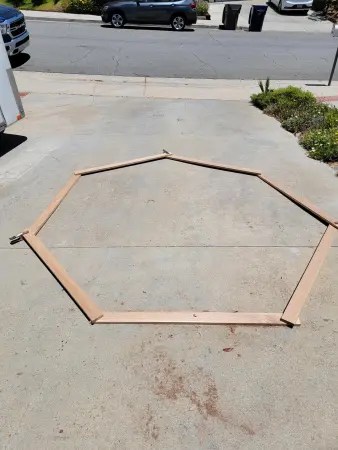
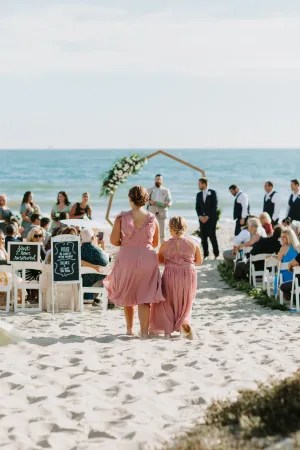
The biggest project in many ways was making the 7-sided arch, AKA a heptagon or a septagon. Internal height had to be big enough for E to be nicely framed … so 78″ it was.
Luckily, there are some handy polygon calculators on the interweb thingy that told me what I needed. Each side was 3′ – 7″, and every angle had to be 128-5/7 degrees. Simple, right? Of course, the miter gauge only has degrees, not sevenths of a degree. Time for some fancy footwork. Apparently.
The sides of the arch were configured with 3 lengths of lumber connecting to 2 lengths of lumber using finger joints and bolts to hold it together. I nailed pieces in place to reinforce each joint so that the angles would not vary one-seventh of a degree from the design. The joinery was important, as the arch had to come apart for transport.
And the heptagon would be assembled and installed by the venue’s staff, as I was to be elsewhere. I was told that I would be elsewhere a few times, so I knew it was true. And since I was to be elsewhere, I labeled each joint with a letter so if they put joint “A” together with the other part of joint “A,” all would be well.
The base was the final piece I made, and required a lot of head time to visualize what was needed. Because 7 is an odd number – stay with me here – the finger joints had to be 3 fingers on one side and 2 fingers on the other in order to mate up with the other 6 pieces of the heptagon. After a lot of staring at the wall time, I finally got simple and made the bottom with 5 pieces of lumber all the same size – but sticking out 3 fingers on one side and 2 fingers on the other. It was simple, but it was not simple to me on July 20. And the wedding was August 5.
The base was destined to be buried in the sand, but it had to have the structural integrity to both support the heptagon sticking 7′ into the air … and not blow over if an ocean breeze decided to attend the wedding. So, as I am sure you can see, I felt no pressure as I made up this plan staring at the wall.
Finish was brush on urethane, suitable for outdoor applications. The heptagon is destined to take up residence in the back yard of the Kenderas when they build out that landscaping … but first, the heptagonal arch had an important date with a beach.