Then I found the hardware needed to make cheese slicers. And, here we are.
Slicers are all approximately 7″ wide and 11″ long. The tightly stretched wire will cut hard cheese, soft cheese … all cheese. If you are an eater of cheese, you need to be a slicer of cheese.
There are now 22x of these slicers available, and pricing is between $50 and $90.
I’ve been making wooden coasters for a while now (though I’ve been out for over a year, so….).
In any event, I have seen wooden coasters made by others … and found them wanting.
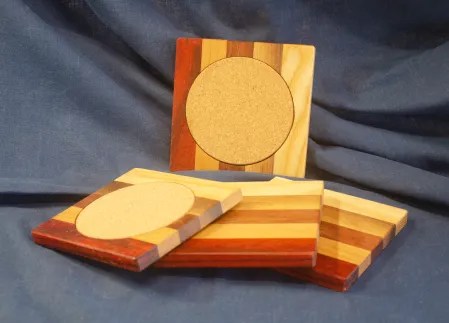
The purpose of a coaster is to protect the table surface from water condensation and scratches from the bottom of the glass. The purpose of the coaster is NOT to use up a woodworker’s small “scrap.”
I don’t have scrap. Ever. I use the wood that I have, and find what each piece of wood should be. That’s my job.
So, I make coasters on blanks that make 4x coasters. Each blank is 22″ long, and has to go through the CNC and the table saw to make a 5″ square piece of wood … with a 4″ cork insert on one side.
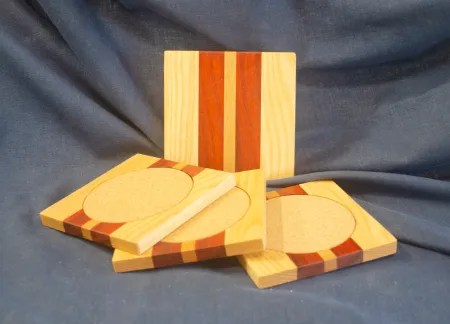
I have found that some people like 4 matched coasters, how I make them. However, there are many people that like a set of 4 coasters that are similar but not exactly alike. These are what I call chaos coasters, and these are Mrs M’s people. My mind is much more linear. Hers is more … chaotic.
I mean no disrespect. Believe me?
So, coasters come in sets of 4. Some are matchy matchy, and some are … in chaotic groupings. Y’all get to choose.
Well, not really. I’ve had it stored on end in the cut-offs rolling cart for most of that time, waiting for me to figure out what it was. The cut off was about 30″ long, 8″ wide … and I wasn’t sure what it was. It had really pretty, creamy sapwood on both sides, some bark, and that vibrant yellow from newly smoothed Osage Orange in sort of an hourglass shape down the middle.
It was pretty. But I didn’t know what it was.
So, as I occasionally do, I went to what’s her name for inspiration. It went something like this.
Me: “This board is pretty, but I don’t know what to do with it. What should I do with it?”
Her: “Make something.”
Me: “But what should I make? I like this wood.”
Her: “Cut it up and make a board.”
I swear that’s what she said.
See? Great inspirational dialogue. That’s why we’ve been married for 45 years.
So here is that pretty board. Pure Osage Orange, AKA Hedge. The vibrant yellow will darken with age and UV exposure, and end up being a medium brown. The creamy sapwood (newer growth) will not change color much, I believe.
Small Board 23 – 401a. Osage Orange. Approximately 9″ x 11″ x 5/8″. Non-skid rubber feet.
Since the Lady was so much help, I left an Easter Egg for you to enjoy.
The Board Chronicles is an ongoing series of articles about the adventures of Mr M’s Woodshop as a vendor at community festivals & craft fairs. Learn about the horrors of The Road. Read the impossible demands of the people that know what I should really be doing. In short, it’s the comedy of errors that has become my life, presented here, like my cutting boards, as simple unvarnished truth. All for your amusement … and for the good of vendor-kind.
I was very excited about journeying to Northern California to be a part of the California Artisan Cheese Festival in Santa Rosa. I’ve always been focused on serving pieces, and this seemed like a very nice, targeted event.
The year was 2020, and then the world went to hell.
The 2020 event was cancelled due to covid, of course, like almost every public event in California that year. And again in 2021. And, for many events especially early in the year, 2022 was not different. For 3 years, this event was lost to me.
Finally, 2023 became a new opportunity. Thank goodness.
This Festival is a series of events over a long weekend with artisan cheese classes, food pairing events, farm tours and more. On Sunday afternoon, a vendor event is produced with a very large group of artisanal cheese producers – many with their own herds for true farm-to-table cheese – as well as related vendors including vintners, brewers, distillers … and woodworkers, among others. About 100 vendors were gathered for this 5 hour event.
New Ideas
I broke many rules to do this event.
This is a one-day, 5 hour event. I don’t do one-day events.
Since this event was 400 miles away from our home, I had to drive and stay in a hotel for … a one-day, 5 hour event. That never would have happened independently of any other good ideas, so…
Mrs M made a rare appearance at this event, playing the part of a Foodie enjoying the best of cheese while I was working like a dog in the booth. So, the event became the *excuse* to do a long weekend in Wine Country. We spent 5 days visiting Healdsburg, Sonoma, St Helena, and more. If you like wine, if you like food, if you like to wander … wine country is a great getaway.
Since I was all in for the event, the first event of 2023 … I created Serving Trays as a base for Charcuterie Kits to debut at this event.
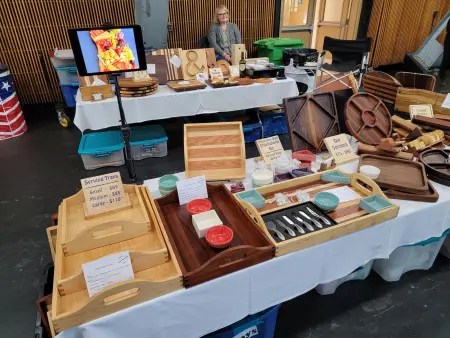
I didn’thave walls (the event is indoors at the county fairgrounds, no canopies/frames allowed), so I could not hang pictures. And I had just done nice photography of the charcuterie kits … so I did a thing. I produced a Power Point presentation to show on my tablet, which was mounted on the table above the serving trays. The mount cost all of $22 and displayed the “boards in action” photos that really help illustrate what my boards can help you do. New presentation idea, powered by a portable battery we have to re-charge cellphones at un-powered events. Worked like a charm!
This was a getaway weekend, with a destination of a single booth at a targeted event … so I left the trailer at home, and packed the truck with what I needed. The limiting factor of the truck meant I left many products at home, but focused exclusively on serving pieces appropriate for artisanal cheese, charcuterie boards … or whatever people serve things on.
Observations
The display was more farmer’s market than fancy art boutique. It was a very casual atmosphere, a table top event (which, again, I never do these days). The promoter provided 2 8′ tables with short table cloths. I brought an additional 4′ table, and that was the total base of the display.
We arrived at 8a, and were set up by 9:30. The event didn’t start until 11, so we were perhaps a bit early. But you never know what the challenges are at a new event in an unfamiliar venue. It’s good to relax and check out the event before the masses arrive.
Mrs M being there means that she messes with my display. She improves the look of the booth, she says. She makes it better, she says. She increases sales, she says.
I have no idea what she’s talking about.
The floor was busy during this event. Estimated attendance of 1,500, all there to sample cheese and wine … and beer and nuts and bread and whatever vendors were giving away. Lines were 20+ people deep, 8-10 minutes for a “hot” vendor like Cowgirl Creamery or Beehive Cheese Company.
I had talked to the promoters about my unique presentation (compared to the food vendors sampling their creations, I was the weird one). They put me in a corner booth so people could walk on 2 sides of the booth. That was good.
They also put me across the building, in front of the bandstand. That was bad. (The band was primarily acoustic with a banjo, clarinet, tuba and percussionist. Very fun Americana music and not too loud.)
They also put me on the path to the bathroom. That was good. I guess.
Booth locations are something that I do my best to ignore, honestly. Vendors don’t control them. Why get upset about where you are when it’s someone else’s decision? I’ve run events. I’ve assigned vendors to booth locations. I’ve also dealt with upset vendors that just lost their minds because their location … wasn’t whatever they thought it should be. I don’t want to be that guy. My location was FINE. People could see me. We were not blocked by a line. If people were looking for a wooden object, they knew where I was.
But I brought cheese boards … I didn’t bring chess boards. That was a request. As were book shelves. I politely said sorry! … just as I happily dispensed free advice on how to deal with a permanently mounted wooden cutting board embedded into a stone counter. I am old, so I must be wise. I guess.
There were actually 4 woodworkers there. Two were really focused on traditional cutting boards and one exclusively made seascape resin boards using that dreaded bulbous grass, AKA bamboo, as their base. Truly I did not compete with any of them.
My first 3 sales were Charcuterie Kits and Serving Trays. Vindicated, I was.
And I said that out loud to the Lady. So, of course, I didn’t sell another one.
For a five hour event that was an excuse to drive 400 miles … this was a winner. I sold enough to pay the entire hotel bill, gas and vendor fee. The Lady got to geek out on cheese … and found the highly-sought cheeses that are used in the world’s best grilled cheese sandwich (found at the Rustic Bakery & Muir Woods National Forest) as well as the fabulous Very Adult Mac & Cheese from the Market in St Helena. Both of these dishes served as destinations for us during the weekend, so buying the necessary cheeses was a great coup.
Sometimes, going a-vendoring is about the journey, not the destination. I’m taking the win on this one.
The Food
When we travel, the Lady busies herself in the passenger seat stalking restaurants in our destination city to choose the ultimate, best dinner she could find. It’s her thing. This trip, however, it just worked out that we did lunches as our culinary adventures, and “settled” for take out most evenings.
Best Meal: Pizza Verde at The Journeyman, an Italian charcuterie in Healdsburg that makes their own sausage salumi. The pizza featured soppressata, an Italian sausage sometimes made by pressing the meat between 2 boards. It was amazing. And we just might have purchased a lot of sausage to bring home. And a guillotine to cut it. And joined their meat club. Hey, we were on vacation.
The Other Best Meal: A pannini-style grilled cheese sandwich, the Marin Melt, with Rustic Bakery‘s Honey Whole Wheat bread, Two cheeses are combined: Cowgirl Creamery Mt Tam and Point Reyes Toma cheese.
Honorable Mention: Very Adult Mac & Cheese, The Market, St Helena. I added chicken, the Lady added crab. Draw your own conclusions. We had this dish a few years ago when we visited Little Girl at her nearby college, Sonoma State in Rohnert Park. Simply fabulous food. Worthy of being a destination.
Worst Meal: We went out one night, Monday night. Most restaurants were closed (oops). Choice # 1 was an Italian restaurant that wanted reservations (double oops). Desperation drove us to another relatively well reviewed Italian restaurant, Alfredo’s in Petaluma. It was horrid. Made the Lady sick, even. My belief is the Mexican American cooks had no clue how to follow the Italian recipes they were given. Every dish was just … off. Mrs M later found a couple of bad reviews that talked about “cooks in training.” Sorry, not for a dinner costing over $100 for 2 with no alcohol.
The Facts
Total miles driven: 852
Booth cost: $250
# of people we met during the event from the producer: 4
Visits in the booth by a promoter’s representative: several
Returning next year? Yes. This is a great event for cheese enthusiasts … and Mr M’s Woodshop belongs there.
This post is the culmination of a great deal of work by many people. And as I hope you will agree, it was well worth the effort!
Serving Trays were just the beginning point for me. The goal was to offer fully customizable Charcuterie Kits at my first event in 2023: the California Artisan Cheese Festival in Santa Rosa in just 2 weeks. As the pictures attest, I am ready.
You start with a Serving Tray … see them described, and see them very naked, here. This page is all about dressing them up.
Charcuterie is classically a collection of smoked meats and cheeses served to the delight of hungry people everywhere. The idea is really trending now, and people are taking the excuse of having a nice serving piece to do all sorts of offerings on a lovely serving board. To complete the presentation, I have collaborated with my good friend and potter, Nicole, the owner of NZ Designs Studio. She is also the maker of the Great Garlic Graters that are on my Garlic Dipping Boards, which continue to be a favorite.
After more than a few discussions about what would be ideal, she has made 4″ bowls – or ramekins, if you prefer – in 3 shapes and 4 colors (well, 5 colors. She’s an over-achiever.) that can be purchased at events for inclusion with your Charcuterie Kit. In addition, she has made very cute meat and cheese tags to identify some of the classic Charcuterie that you will probably be serving.
Then I went shopping and found sets of stainless Cheese Knife Sets that I am also offering to help complete your presentation.
You get to pick and choose among the options … but let’s not get ahead of the idea. The best way to understand this idea is to see it. I gathered family, friends and collaborators to create some unique and tasty boards for your consideration.
A big thanks to the food stylists and helpers that made this happen. I appreciated the eaters that helped when the work was done, too!
Nicole’s bowls are Red, White, Blue, Green … and Purple. You can go all matchy matchy, or buy your ramekins in all different shapes & colors. We did it both ways on the boards pictured. You get to choose what you like best.
Here are simpler pictures showing just the Serving Trays in the 3 sizes, along with the bowls in all of their colors. The knife set is also shown; a great matched set of 6 knives with spreaders, choppers, forks … just what you need to do anything from cut a hard cheese, spread a soft one, or pick an olive out of the bowl.
To purchase a serving tray, go here. If you want a charcuterie kit, or any of the pieces offered that tickle your fancy, then you’ll need to email me and we can work out the details. I will warn you that nothing will ship until late April. That’s good: you get to choose what you most like, and I will make sure you get exactly what you want.
It’s good to get things out of my head. These Serving Trays were a long time coming.
I knew I wanted to make trays with sides on them. That’s a classic serving piece, and I’m all about serving pieces. I needed to do serving trays. Finally, I found the way.
Serving trays are in 3 sizes: 12″x12″, 13-1/2″ x 19″ and 15″ x 24″. Small, medium and large. The 3 trays nest together nicely for easy storage, if you are so inclined. Sides provide 1-1/2″ of wall around the bottom of the tray, helping you corral whatever you might be putting on the trays.
Construction details are robust: all hardwood construction (naturally). The corners are connected with sturdy box joints. The bottoms, 3/8″ thick (and again, all hardwood), are captured in dados on the ends and sides for reliable load carrying. These trays are meant to be heirloom additions to your home.
The sides & ends are made of one of these three woods: Hard Maple (the lightest color), Cherry and Sapele (a very pretty dark brown wood, AKA African Mahogany). The bottoms are matched in some cases, and stripey in others. You can mix and match your set of 3 if you wish.
The initial thought for these trays was for them to be the base of Charcuterie Kits, and indeed, they are. If you want to see some pretty pictures of Charcuterie done at VMICA (the Velda Mowry Institute of Culinary Arts), then you can go here.
If you would like to purchase, that link is here. Please note that orders can be placed today, but I do not expect to ship until the end of April. The good news is you can order exactly what you want. The bad news is … exactly what you want takes time. My job is to make sure there is a smile on your face when you finally get to see your new Serving Tray!
Here are my current signs, in a slide show. And lower on the page … NEW SIGNS coming for this holiday season.
CNC Sign 20 – 141 – In Wine
CNC Sign 19 – 750 Let Food
CNC Sign 19 – 745 Coffee Def
CNC Sign 19 – 742 If More of us Valued
CNC Sign 19 – 739 Why Limit
CNC Sign 19 – 741 Many Have
CNC Sign 19 – 738 Too Much
CNC Sign 19 – 731 You Don’t
CNC Sign 19 – 725 People Who Love
CNC Sign 19 – 724 You Don’t Have To
CNC Sign 19 – 708 – Chicken
CNC Sign 19 – 706 If You Really
CNC Sign 19 – 705 – Only A Fool
CNC Sign 19 – 702 – Too Lazy
CNC Sign 18 – 115 Tell Me What Brand
CNC Sign 18 – 99 Cooking
CNC Sign 18 – 99 The Secret Ingredient is Always
CNC Sign 18 – 55. Hard Maple. 9″ x 14″.
CNC Sign 18 – 57. Hard Maple. 10″ x 16″.
CNC Sign 18 – 48. Cherry. 12″ x 16″.
CNC Sign 18 – 45. Hard Maple. 10″ x 14″.
CNC Sign 18 – 19. Hard Maple. 10″ x 18″.
CNC Sign 18 – 12. Hard Maple. 12″ x 16″.
These are software renderings of the new signs that are currently in production in the shop. The images are not entirely accurate, but they are the best I have at this point.
Not all of these signs are currently shown for sale on my retail site, but if you don’t find a sign that you want, just email me and I can do a special order for you. Here is the retail site for your review: www.MrMsWoodshop.com.
Little Girl was marrying E, and I asked if they wanted me to build anything for their wedding.
The answer was yes, and I got a to do list that was 3 items long:
A board for guests to sign. A keepsake.
Sets of candle holders to decorate the reception.
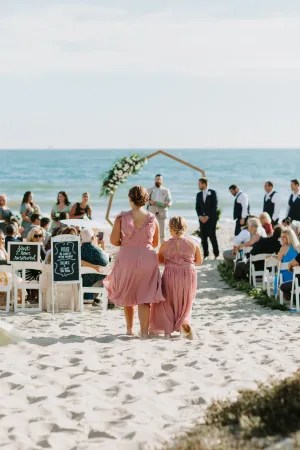
A heptagonal arch for the wedding ceremony.
I decided to make all 3 items out of white oak. I start with lumber.
No, this was not all of the lumber. I ended up getting a whole lot more lumber before it was all built.
The sign-in board was a simple 24″ circle, cut on the CNC. I then went to my buddy the flag maker, who used his laser engraver to cut words out of 1/8″ ply. Those were spray painted burnt umber with an acrylic spray, and then mounted on the piece. The whole assembly got a top coat of rattle can lacquer.
The time consuming project was making candle holders. I made 12 sets of 3 … so 36x pieces with 4 sides, 1 shelf and 16 accent pieces. Each. That’s a lot of pieces. The lumber had to be planed down to 1/2″ thick, so I generated a lot of sawdust on this project.
A lot of sawdust.
These candle holders are one of my favorite projects, actually; I first made them about 10 years ago for Christmas presents.
I have learned a bit and upgraded the garage shop since then, thankfully, so the lumber went from track saw to table saw to planer to table saw to CNC to router table to assembly.
A unique part of this project is how you assemble the sides that have chamfered edges to fit perfectly into a square without showing the wooden edges. No nails are used, just glue. And how do you join slippery sides of a square together without nails?
You rubber band them together until the glue dries.
Then you do the same process for the Walnut accent pieces, rubber banding them into place until that glue dries. The raw wood was then finished, again, with rattle can lacquer.
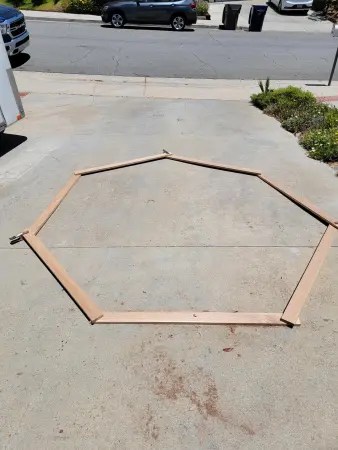
The biggest project in many ways was making the 7-sided arch, AKA a heptagon or a septagon. Internal height had to be big enough for E to be nicely framed … so 78″ it was.
Luckily, there are some handy polygon calculators on the interweb thingy that told me what I needed. Each side was 3′ – 7″, and every angle had to be 128-5/7 degrees. Simple, right? Of course, the miter gauge only has degrees, not sevenths of a degree. Time for some fancy footwork. Apparently.
The sides of the arch were configured with 3 lengths of lumber connecting to 2 lengths of lumber using finger joints and bolts to hold it together. I nailed pieces in place to reinforce each joint so that the angles would not vary one-seventh of a degree from the design. The joinery was important, as the arch had to come apart for transport.
And the heptagon would be assembled and installed by the venue’s staff, as I was to be elsewhere. I was told that I would be elsewhere a few times, so I knew it was true. And since I was to be elsewhere, I labeled each joint with a letter so if they put joint “A” together with the other part of joint “A,” all would be well.
The base was the final piece I made, and required a lot of head time to visualize what was needed. Because 7 is an odd number – stay with me here – the finger joints had to be 3 fingers on one side and 2 fingers on the other in order to mate up with the other 6 pieces of the heptagon. After a lot of staring at the wall time, I finally got simple and made the bottom with 5 pieces of lumber all the same size – but sticking out 3 fingers on one side and 2 fingers on the other. It was simple, but it was not simple to me on July 20. And the wedding was August 5.
The base was destined to be buried in the sand, but it had to have the structural integrity to both support the heptagon sticking 7′ into the air … and not blow over if an ocean breeze decided to attend the wedding. So, as I am sure you can see, I felt no pressure as I made up this plan staring at the wall.
Finish was brush on urethane, suitable for outdoor applications. The heptagon is destined to take up residence in the back yard of the Kenderas when they build out that landscaping … but first, the heptagonal arch had an important date with a beach.
Yes, I used that funny French word that people have trouble pronouncing. The word means smoked meats … and, when in France, you go to a “charcuterie” to buy, uh, smoked meats.
Why did that become the word we use for cheese & cracker platters?
’cause it’s fancy. “Fancy like Applebees,” as Walker Hayes recently sang (link below).
But I digress. Now that we’ve got our groove on, it’s time to talk about these new boards that have a couple of unique stories to go with.
First, I am pleased to present several boards made from Olive wood, which is new to the Woodshop. After years of searching, I just had to go out the front door to get this wood … when we bought the house in 1988, there was an ornamental olive tree in the front yard. The kids climbed in it growing up. Pretty tree, and a great climbing tree, to boot. But, sadly, the tree died several years ago. I had a crew out to remove the tree … and leave me the good logs. I then went to my buddy Charlie to “slab” the logs and branches that were usable. The ends got painted with a latex/wax combination so the wood would dry slowly and not crack. The wood then got stickered (small boards between the Olive pieces to allow good air flow for even drying) and then I left the wood in my storage unit to dry out. I didn’t touch the boards for 18 months.
Eventually, the boards came back to the shop for processing … and, time being what it is, I didn’t touch them for another 2 years.
But then the stars aligned, and I made the boards you see below. These are live edge pieces, meaning the actual edges of the natural tree – maybe even the bark! – is the edge of the board. About half of these pieces are finished with mineral oil and board butter, as I do all of my pieces that are destined to touch food.
Until now, that is. Some of the boards had knots, voids and cracks that needed attention, and needed filling since they were destined to be serving pieces. I reached into the bag o’tricks, and here are my first boards with epoxy filled, mica-colored accents. These boards were then finished with a Urethane top coat.
As is normal for me, all boards got non-skid rubber feet held on with stainless steel screws.
Two of the boards are made from live edge Black Walnut. My niece – the namesake for the “Kaye’s Board” end grain design that is a personal favorite – found a sawyer near Cameron, MO that had processed some lovely Black Walnut lumber and was willing to let me bring 5 boards back to the Woodshop.
So, new lumber. New finishing. New, as it often does, also means Mrs M had to have some.
But, good news, she decided to not be greedy and I do have some left for your consideration. These are, obviously, very unique, one-of-a-kind pieces. Please note that all sizes are approximate. Every board was finished to get the most out of the wood that was available, so they are not perfect rectangles. They are natural.
I have already heard from several people that want some, and 3 ladies are first in line (Jeri G, Reva W, Sue E in that order). Boards that I still have will go with me this 4th of July weekend to the Art In The Park event in Morro Bay, CA. Want to buy one? Email me at Henry@MowryWoodshop.com. You’ll need to tell me the number of the board(s) you want, and please give alternate choices if you have some. I will send you an invoice, and then ship the boards to you after the holiday.
Charcuterie 22 – 114. Olive Wood with Live Edge. Mineral Oil/Beeswax Finish. 21″ x 5″ x 1″. $100.
Charcuterie 22 – 111. Olive Wood with Live Edge. Mineral Oil/Beeswax Finish. 17″ x 9″ x 3/4″. $100.
Charcuterie 22 – 109. Olive Wood with Live Edge and Epoxy Accents. Urethane finish. 21″ x 7″ x 3/4″. $100.
Charcuterie 22 – 107. Olive Wood with Live Edge and Epoxy Accents. Urethane finish. 16″ x 6″ x 1″. $90.
Charcuterie 22 – 105. Olive Wood with Live Edge and Epoxy Accents. Urethane finish. 20″ x 8″ x 1″. Added to the Mowry collection.
Charcuterie 22 – 103. Olive Wood with Live Edge and Epoxy Accents. Urethane finish. 17″ x 7″ x 1″. $100.
Charcuterie 22 – 115. Olive Wood with Live Edge. Mineral Oil/Beeswax Finish. 16″ x 5″ x 1″. $100.
Charcuterie 22 – 117. Olive Wood with Live Edge. Mineral Oil/Beeswax Finish. 15″ x 12″ x 1″. $125.
Charcuterie 22 – 104. Olive Wood with Live Edge and Epoxy Accents. Urethane finish. 20″ x 8″ x 3/4″. $100.
Charcuterie 22 – 106. Olive Wood with Live Edge and Epoxy Accents. Urethane finish. 19″ x 9″ x 1″. $125.
Charcuterie 22 – 102. Olive Wood with Live Edge and Epoxy Accents. Urethane finish. 21″ x 7″ x 1″. $100.
Charcuterie 22 – 113. Olive Wood with Live Edge. Mineral Oil/Beeswax Finish. 20″ x 7″ x 3/4″. Added to Mrs M’s private collection.
Charcuterie 22 – 101. 19″ x 7″ x 3/4″. Olive Wood with Live Edge and Epoxy Accents. Urethane finish. $90.
Charcuterie 22 – 108. Olive Wood with Live Edge and Epoxy Accents. Urethane finish. 19″ x 9″ x 1″. $125.
Charcuterie 22 – 112. Olive Wood with Live Edge. Mineral Oil/Beeswax Finish. 16″ x 6″ x 1″. Added to the Mowry collection.
Charcuterie 22 – 116. Olive Wood with Live Edge. Mineral Oil/Beeswax Finish. 20″ x 6″ x 1″. $100.
Charcuterie 22 – 118. Black Walnut with Live Edge. Mineral Oil/Beeswax Finish. 12″ x 12″ x 5/8″. $85.
Charcuterie 22 – 110. Black Walnut with Live Edge and Epoxy Accents. Urethane finish. 21″ x 10″ x 5/8″. $100.
I make these Deviled Egg Platters to help make the world a better place. They are difficult to make: each one takes 9 hours to carve on my CNC. It takes about 90 minutes to hog out most of the waste with a 1/4″ end mill, and then a 1/16″ tapered ballnose bit advances 1/100″ with each pass to make the egg cups as smooth as possible.
Labor of Love, they are.
Here are the latest 11 that I have completed. 2 are already gone. The 9 remaining will be going to Bishop Mule Days over Memorial Day weekend … so if you would like one of these for your holiday table, speak now and I will get it shipped to you, no problem.